Agelong Tree 5 Help
User Tools
General info
Data manipulation
Family tree
Reports
Files manipulations
Licensing
Extra
This is an old revision of the document!
Table of Contents
Tree options
All tree options are organized in groups on the following tabs: Content, Apearance and Persons in the tree options window.
Contents of the tree
On the Contents tab you can choose the type of relatives that you want in the tree.

For example, Only direct relatives allows only your direct ancestors and direct descendants. If the Spouses option is ticked, in the direct relatives tree you will also see the spouses of your children and other spouses of your ancestors (although they are not your direct relatives). Same about the blood relatives tree: if the Spouses is ticked, you will see all wives and husbands of your blood relatives although those are not your blood relatives.
If you do not want to see any ex-spouses, tick the option Do not show ex-spouses.
You can also choose how to see the adopted children and adoptive parents in the tree. If you choose No adopted children, no adopted children are shown in the tree. If you choose Adopted children as blood ones, you will see the descendants of the adopted children in your blood relatives tree.
Same about the adoptive parents. If you choose Adoptive parents as blood ones, in your blood relatives tree you will see all blood relatives of the adoptive parents.
You can use the active filters of the Persons table in the tree: tick the option Apply active filters of Persons table in the tree. The tree will include only the persons who correspond to the active filters of the Persons table. If Break at filtered out persons is active, the branch of the tree is stopped at the person that does not satisfy the filter condition. If the option is off, the person that does not satisfy the filter condition is shown as a blank square and the branch of the tree continues.
Title is shown above the tree in the chosen font, and Caption under the tree is shown under the tree, by default the captions font is smaller than title font, you can change the font at Appearance tab.
If you tick Statistics and Generations statistics, you will see the family tree statistics under the tree and statistics for each generation on the left from the tree.
If you want to build a family tree on a separate tab, tick Each tree on separate tab. It can be helpful when you want to compare the two different tree views (with different options, for example, or different backgrounds).
Auto rebuild means that the changes are shown immediately if they are made in the tree.
Family tree appearance
Appearance tab contains options to design your family tree look. The combination of family tree look settings and of tree nodes contents is called a tree style. To save your tree style or to download a tree style (standart, compact, suoercompact or your own saved one) click the Load style or Save style buttons over the example tree which shows the current style design.
In the left upper corner there is a drop-down list where you can choose the direction of branches in the family tree. Descendants can be at the top, at the bottom (vertical family tree), on the left or on the right (horizontal family chart):

При включённой опции Оптимизировать положение супругов супруги, если это возможно, располагаются друг над другом.
При включённой опции Отмечать умерших в левом верхнем углу узлов умерших персон ставится отметка – чёрная ленточка.
В сложных деревьях некоторые ветви не могут быть отображены в месте расположения персоны, от которой они начинаются. В этих случаях персона и соответствующая ветвь переносятся влево или вправо от исходного места. Если опция Выносить ветви в ближайшую сторону включена, то направление выноса определяется по расстоянию: ветвь выносится на тот край дерева, до которого ближе. Если эта опция выключена, то ветви персон, относящихся в поддереву отца корня дерева выносятся влево, а ветви персон, относящихся к поддереву матери корня дерева – вправо.
Расстояния между узлами одной ветви, между ветвями и между поколениями, а также толщина линий указываются в пикселах.
Линии в дереве могут быть одного цвета или разноцветными, в последнем случае программа автоматически устанавливает цвета линий таким образом, чтобы соседние параллельные линии были разных цветов, это улучшает читаемость дерева.
Дерево может быть без фона, с двухцветным фоном (два цвета фона, для чётных и нечётных поколений ) или с фоновым изображением. Для дерева с фоновым изображением опция Сохранять пропорции позволяет растянуть фоновое изображение на всё дерево (опция выключена) или сохранить пропорции фонового изображения (опция включена).
Устанавливается шрифт заголовка дерева и шрифт подписей (подпись под деревом, статистика).
Корень дерева (т.е. узел персоны, чьё дерево построено) выделяется отдельным цветом при включённой опции Выделять корень цветом.
Персоны дерева
На этой вкладке расположены настройки вида и содержимого узлов генеалогического дерева. В левом верхнем углу находится выпадающий список, позволяющий установить, к какому типу узлов относятся настройки: ко всем персонам дерева, к кровным родственникам корня дерева, к прямым родственникам корня дерева, к родителям и детям корня или к самому корню:

На вкладке Поля данных устанавливается список полей данных, отображаемых в узле дерева. Для каждого поля можно установить перенос по словам, жирный или наклонный шрифт, префикс и суффикс поля (например, круглые скобки для дат жизни), а также для каких персон это поле будет отображаться: мужчины или женщины, живые или умершие:

Для полей Название отношения родства, Браки и Комментарий доступна опция Сокращать, которая позволяет отображать краткое значение в данном поле.
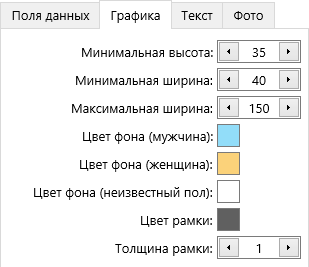
На вкладке Графика находятся настройки размеров и цвета узла дерева, цвета и толщины рамки узла:
На вкладке Текст можно настроить шрифт, выравнивание, отступ и интервал текста узла, установить обтекание текстом фото, включить выделение фаворитов жирным шрифтом:

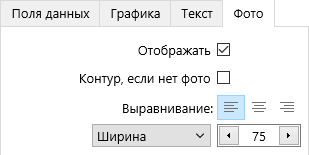
На вкладке Фото находятся настройки фотографии, отображаемой в узле дерева. Можно установить выравнивание и размеры фото, включить отображение контура, если фотографии нет: